This post should serve as a guide on how to transfer Joomla files and documents from a local host such as the WAMP, LAMP or XAMPP Server to a Web Server via FTP. The popularity of Joomla as a content management system, for building simple to complex Websites, is growing on a daily basis. While some Web administrators prefer to build a Website directly on their Web Server, there are others who like to do otherwise. While both methods have their advantages and disadvantages, this article will focus on the latter category. There are three main components that are required in order to make a clean file transfer from a local to a Web Server: an FTP Client such as FileZilla, a cross-platform Web Server package for example, WAMP or XAMPP and a Web Server. Once these are in place, you can proceed with the following steps:
STEP 1
Select all the files in your Local Server and upload unto the public_html (or a sub-directory in public_html) folder on your Web Server. This usually takes a long time, so be prepared to wait.
STEP 2
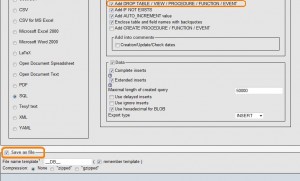
Create a full dump of the SQL database by using a database management tool such as phpMyAdmin on your cpanel. If using phpMyAdmin, log in and choose your database from the left menu and click on the Export tab. Select all the tables, check the Add DROP TABLE box and Save as file then click on Go, as shown below. Do not change any other options.
STEP 3
Now to import the database dump to your Web Server, create a new database (with any name of your choice) with a new username and password from your cPanel and log into your Web Server’s phpMyAdmin interface. Select the new database on the left and click on the Import tab. Browse the location of the SQL file then click on Go to import.
STEP 4
Now adjust the core settings identified in the Joomla configuration.php file in the File Manager. It is very important that you get the database settings right otherwise there will be no connectivity between the Joomla files and the database. Below is an example of the variables that need to be changed –
/* Database Settings */
var $host = ‘getCorrectHostnamefromProvider’;
var $user = ‘mySQLdatabaseUsername;
var $password = ‘mySQLdatabasePassword’;
var $db = ‘mySQLdatabaseName’;
var $dbprefix = ‘databasePrefix_’;
var $log_path = ‘enterCorrectLogPath’;
var $tmp_path = ‘enterCorrectTmpPath’;
The Website should now work correctly if all the information above is entered correctly and your domain name points to the right DNS server of your Web hosting account.
Thanks for reading this article. If you're new here, why don't you subscribe for regular updates via RSS feed or via email. You can also subscribe by following @techsling on Twitter or becoming our fan on Facebook. Thanks for visiting!

22 Comments
Leave a Reply
Cancel reply
Leave a Reply
This site uses Akismet to reduce spam. Learn how your comment data is processed.


Pingback: Tweets that mention Transferring Web Pages from Local Host to Web Server
NJ SEO Company
June 2, 2010 at 2:33 pm
Thanks for the tutorial. Great info!
online pharmacy technician
June 2, 2010 at 7:58 pm
This is actually perfect instructions. I’ve been trying to find out ways to transfer my website from localhost to my Bluehost web server.
Admin
June 4, 2010 at 3:18 pm
Glad you found it useful.
Silver
June 4, 2010 at 5:29 pm
Nice tut i’ve been using classic ftp for years….
.-= Silver ´s last blog ..The 1989 Silver Proof Maple Leaf =-.
Domain name registration
June 4, 2010 at 6:59 pm
Thanks for sharing this tip, it is very useful.
Pingback: Resellerspanel Launches Version 2.0 of Its Control Panel and a New Web Hosting Plan
Replacement laptop batteries
August 19, 2010 at 3:40 pm
Thanks for your advice. It’s really good for me.
Darwin Web Design
September 9, 2010 at 8:02 pm
Very nice step by step tutorial. It is easy to follow and detailed. Thanks for sharing this tutorial.
Joomla SEO Taylor
November 12, 2010 at 3:15 pm
This is a really insightful tutorial. Very useful indeed, straight-forward and not complicated at all. I’m sure people who are new to Joomla would find this post helpful. Thanks for sharing this!
Fred
December 3, 2010 at 8:59 pm
great post
ps: i also use Filezilla – love it!
biz guy
January 30, 2011 at 5:59 am
Bravo. Bumping up phpMyAdmin on my list of tools to master.
Aden Clark
March 13, 2011 at 12:02 am
I always use filezilla for transferring files, although this post was still very useful for me. Thanks.
Danika
April 17, 2011 at 9:21 am
Some great posts on your blog btw.
My question is firstly whether you can do this with a WordPress site as well? Does it have to be a Joomla site.
Secondly, where do I find my “local host”?
thanks!
Chase Adams
April 19, 2011 at 5:14 pm
Is there some way that you can setup the scripts so that they are smart enough to change most of the settings for you? Or are there any WordPress plugins that would help you to do the move without having to be a tech head?
Classifieds
May 4, 2011 at 9:55 pm
thanks for the info. a step by step guide like this is handy to have bookmarked.
Freddy from Web Design Georgia
May 6, 2011 at 5:05 am
Thank you for the help wish I new this years ago.
kelvin
July 14, 2011 at 10:15 pm
Thanks for sharing this with us. Before i use to pay people to transfer my files for me. Now i pretty much do everything on my own
Darin Cunningham
August 15, 2011 at 2:56 am
I tried to launch my site using a free web hosting and domain name for testing purposes. I can’t seem to put it online. Thanks for this tutorial, the problem was the configuration.php file. Now, i have my site up and running.
Paul
March 1, 2012 at 1:25 am
This is definitely a great guide for me as I recently decided to migrate my site to a dedicated server and the host was not willing to do the migration for me without charging me a hefty price. Thanks!
Kummert
March 6, 2012 at 8:58 pm
Hello! Thank you for this very good guide. I will check it out. Bye, Jan
Nigeriaedu
June 6, 2012 at 3:57 pm
You just made my day. After surfing the internet as if no other thing to do. I’m sorry, just have to bookmark this page. Thank you